Wednesday 17 September 2014

Favourite Paris Outfit

I feel like it has been a life time since I book my holidays this year. My wait has made even more enduring as all my favorite bloggers seemed to make it on their holl's before me. So I have been reading every-bodies lovely Paris stories whilst waiting patiently for my turn to experience the city. 

Arc de' Triomphe
Whilst waiting I used my down time to sew up a storm. So much so that it took over blogging for a little while. My aim was to have my own Me Made Holiday and wear at least one thing me made every day. After having a good look at my potential holiday wardrobe I decided to fill in some of the gaps with some everyday basics.

Cycling along the River Seine on my rental Velib
By the time my man and I jetted off, I had two additional Renfrews, a self drafted circle skirt, a Lady Skater Dress and my first ever Kimono (as per By Hand London). I am sure I will post about some of my other makes in the next couple of weeks but for now I want to share with you my favorite holiday ensemble. 
Bonjour!
This one is a really simple combination of my new lilac needlecord self drafted circle skirt and my shameless "I''m going to Paris so I need a stripy top" Renfrew (I literally couldn't help myself). I think the Velib bike (i.e. French Boris bike) and coordinating lilac beret (a bargain €3.50 at a random souvenir shop) finish the look perfectly.

Top of the Eiffel Tower
The dark navy and white striped cotton jersey came from the John Lewis end of 2013 sale. Clearly I have been holding on to it for some time but I think it's true destiny has always been to become my french inspired Renfrew. I made exactly the same version as my first one which meant the pattern was already traced and it was cut out super fast.  To cut this lovely knit  I used my new Olfa rotary cutter which I bough at the Festival of Quilts Show last month. Wow this guy is leagues ahead of the old unbranded excuse for a rotary cutter that I used to use. So, with the speedy cutting and the aid of another shiny new toy (more to come on that one) I had my stripy Renfrew finished off in a couple of hours.

Pretty sure I flashed some tourist taking this shot
On the bottom half, my circle skirt was traced directly from my last circle skirt which cut out all the need to do the maths again. The needlecord was bought even longer ago I think in 2012 in Mandors Glasgow. I had originally planned to make a Kelly Skirt with it but I think I became frigntened of the nap and it just never happened. Never
mind, now it is a wonderful circle skirt with a nice weight behind it which I hope will transition well into Autumn. Plus, it's just so spinny !!!


Wednesday 20 August 2014

Out and About - Birmingham

I have been out and about again! This time I was accompanying my mum down to Birmingham for the Festival of Quilts show at the NEC. However whilst I was down there I took the opportunity to peruse some of the other sewing related gems Birmingham has to offer. 

Birmingham Famous Rag Market

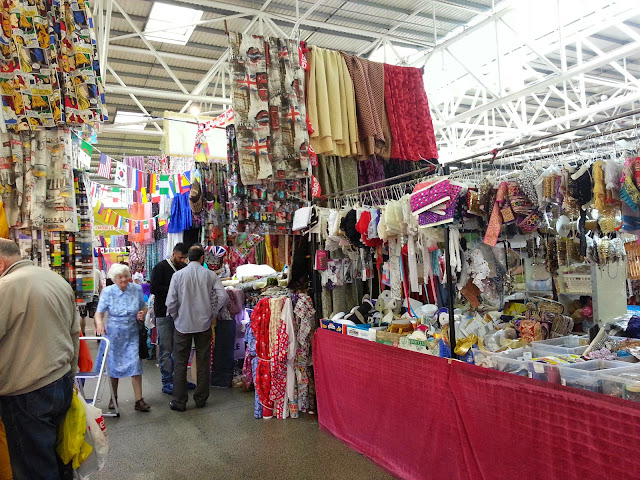
Last time I was in Birmingham I sadly missed the chance to go to the Rag Market, so this time it was at the top of my list. One word...WOW! This place is incredible. I think it could be summed up as being a slightly chaotic mix of chiffon, bananas and fish. It is a little treasure trove of goodies and for people (like me) who love to have a thorough rummage whilst shopping this market is perfect. 


I have found that in a lot of markets the stall holders can be really pushy and pester you to buy thing however this was not the case in Birmingham. Everyone was very chilled out and there was no hard sale. As for the prices yikes! After spending the previous day at the festival of quilts looking at designer cottons prints some of which were going for nearly £25/m I nearly jumped for joy when I saw lace for £7/m,  cottons for £3/m, net for £2/m and even some jersey for £1/m.

Check out this wall of zips! Not only was there loads of fabric at the market but there was also an abundance of notions including buttons, elastic, ribbon, lace, trims and everything else you can think of.
Needless to say a made a few purchases. I wont bother detailing everything but I bought several solid colour stretch fabrics, some chiffon to have a play with, several zips because you just never know when you'll need one and also a dozen buttons because I just can't help myself!

Just to prove that there was bananas too.

Fancy Silk Store

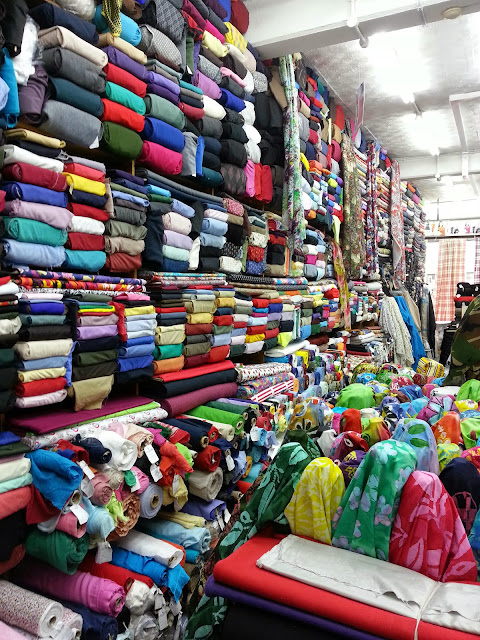
I also popped in to the Fancy Silk Store across the road from the market. I was totally overwhelmed by the volume of fabric. It went all the way to the ceiling! I only had a quick look in the shop as I didn't want to be tempted in to buying even more but they looked like they had a fantastic selection of cottons and jerseys as well as a large selection of wool and suiting fabrics.


 The only thing I would say is that due to the volume of fabric and the way it is stacked up, I think that you would need a lot of help from the shop staff to reach the bolt you were thinking of buying. I was a bit worried that if I yanked a bold to hard the whole wall might come down.


Guthrie and Ghani

I didn't take any photos but I did hop on the number 50 bus out to Mosley to visit Guthrie and Ghani. I took the same trip in March so I knew what to expect and I already had my shopping list together. My plan was to buy the Colette Hawthorn and Macaroon patterns, however, by the time I arrived at the shop I decided (mainly because it was howling a gale) that instead of the Macaroon I was Colette Anise Jacket instead (sorry macaroon maybe next time). I am waiting for the fabric shops at home to get their winter stock in before I buy fabric for the Anise so for just now I only bought fabric for the Hawthorn. The Hawthorn as a dress requires quite a large meterage so I decided to just buy enough for the top version. I figured that way I ca work on any fit issues I might have with the bodice befor I invest in a larger quantity of fabric. So in the end I settled on this bluey grey linen effect cotton, which I think will make a lovely crisp top.


Also I was really excited to see that GandG are stocking Deer and Doe patterns now, I think they might be on the list for net time too. Also I just want to say thanks to the great staff at GandG I was given some excellent recommendations for breakfast (Cherry Reds) and coffee (Yorks Bakery Cafe) in the city centre.

Thursday 14 August 2014

The Mother Daughter Quilt

Time for something a little different (well for me anyway). 
Over the past couple of months I have been making plans for a baby gift for one of my fellow crafty friends. From the second I found out she was expecting I knew I wanted to make her something special. I got straight on to Pinterest for some inspiration. I went through several different ideas ranging from simple bibs to cute little outfits but in the end I decided that a baby quilt was the way to go.


For the uninitiated, the world of quilting is pretty daunting. I found that narrowing down the choice of fabric and design was definitely the most difficult part of the process. My first dilemma was obviously not knowing if baby was a boy of a girl so for the first few months I just had to wait patiently. Fortunately mum to be was soon told that there was a high probability that she was expecting a girl. After this exciting news I decided to go for the Moda Storybook charm pack as my main fabric choice.  Storybook contains a wonderful mix of dreamy prints including hot air balloons, princess castles and little birds, perfect for a little girl (although I have seen some wonderful boys quilts made from the range too).


Seeing as this was my first ever quilting project, I wanted the design to be fairly straight forward. I knew I wanted to stick with a design based around charm squares as I think they are a great size for small quilts. Each square is small enough to be in scale with the small quilt but is still large enough to display the fabric and prints nicely. So with that in mind and after a lot of pinning I found this pin which had a list of perfect tutorials from ohfranson. The I settled on Charm Squares Quild Redux  for my final design as it is an ideal pattern for beginners with no complicated angles, curves or difficult cutting.


To give me a kick start and guide me through the world of quilting my Mum very kindly came over to my flat for the weekend to help me piece together the quilt top. It was the first time that my mum and I have both worked on the same project and it was a lovely experience to produce something together. With my mums experience in quilt making we made quick progress with the piecing.


This was our sewing setup. Mum at the front and me at the back. You might recognise the blue Quiltofax that I made my mum for her birthday earlier this year. It has been working great for her and she has had some lovely comments from sewing friends (one of whom is even planning to make her own).


One thing I found whist making the quilt, there is absolutely no where to hide! Sometimes, in dressmaking, you might have a slightly dodgy seam, wonky hem or just can't be bothered finishing all those raw edges. However, when making a quilt, these little details can't be hidden with a belt or taken in at a later date, everything has to be exact! To add to this you also can't get away from needing to press every little seam.


One thing that my mum is a particular fan of is tacking. I know a lot of people use adhesive sprays, curvy safety pins or even tack guns for sandwiching their backing wadding and top together. However, mum is a traditionalist when it comes to these things, so we hand tacked everything together. It was pretty quick on a quilt of this size (33" x 40") but I imagine it would have been quite back breaking on a full size quilt. Having the whole quilt hand tacked definitely had its benefits when it came to the quilting stage. I think negotiating between safety pins would have been a bit of a pain.   


Thank goodness for walking feet! I hate to think what it would have been like to quilt this without it. I opted to keep the quilting pattern fairly simple and continue the theme of lines and rows. As it is a baby quilt I also wanted to keep it quite soft and didn't want to make it too stiff with a tight quilting pattern.


Shortly after baby Catherine was born I created this little label for the back of the quilt with her name and date of birth. I also embroidered a pair of baby feet inspired by one of the designs in my Doodle Stitching: The Motif Collection book.


I stitched the label in to one of the corners at the back of the quilt and then hand stitched the rest of the binding. Normally I am not a big fan of hand stitching but in this case I found it quite exciting. I found that hand stitching the binding was the very last step and was akin to framing a new piece of art. 
I like the look of the hand finished binding my only concern is how it will stand up against frequent washing. I guess if is starts to unravel it can either be hand stitched again or I can run round it with the machine.


So here is the finished article. I am really pleased with the way it turned out. I wouldn't say that am a quilt making convert but I did really enjoy making this little one. Also, I think as it is a gift for a friend and a project that my mum and I both worked on that makes it even more special. 


I thought you might all like to see a quick pic of little Catherine. She is sooooo cute! So Catherine,I hope you like your new quilt. Hopefully, it will keep you cosy in the colder months and give you comfort for many more years to come :-)

Monday 28 July 2014

Love at First Stitch the Delphine Skirt

I was really excited when Jane of Handmade Jane announced the One Pattern, One Week (OPOW) challenge. I didn't take part in MMMay this year as I felt I didn't have enough outfits to make a decent pledge. However with OPOW running over only one week and potentially only requiring a couple of garments I am definitely up for taking part.


The first challenge with OPOW is obviously which pattern to choose. I found it really interesting reading Tilly of Tilly and the buttons finding from the last OPOW (check out these graphs!). Last time found that tops in particular the Colette Sorbetto came out as most popular. However I decided that skirts were the way to go for me. I narrowed it down to my TNT Kelly by Megan Nielsen or new to me Delphine from Tilly's Love at First Stitch book. In the end I opted for something new and so after the success of my first one, the Delphine won.


I picked up this mid weight stretch floral denim on Goldhawk Road during my London trip. It has a wonderful ready embroidered selvage along one side. To be honest this was my first purchase on my Goldhawk Rd shopping trip as as the day went on I kinda fell out of love with it. I bought it with many great ideas but after carting it about all day (it was pretty heavy folded up) I was beginning to loath it and wonder why the hell I had bought it. In hindsight it was a good purchase and it is now a very comfy and fun Delphine.


 Mainly due to the fabric choice I ended up having to make a few changes to the pattern. On the whole it is the same pattern but I did lengthen it by around 1.5 inches as I was concerned it might be a bit short for me. As the denim came with a pre-embroidered hem I also too into consideration that the bottom of the skirt could not curve up at the sides as per the original design. Therefore I straightened the hemline so I didn't have to cut into the embroidery. I hope that these alterations have not taken away too much from Tilly's original design. I think for my next Delphines I will be sticking more true to the pattern.


I decided not to line the skirt as frankly it is just too flipping hot just not to think about lining. Plus I don't think it is totally necessary with denim. I finished the waistband with a fuchsia bias binding which has been in my stash for a while now. To stop the seams flapping about I also made sure that everything was neatly top stitched in to place.


My photos were all taken on a fab day out in Edinburgh Botanical Gardens. It has been so sunny lately that a trip to the gardens was a must. Also check out this gorgeous world war 1 commemorative poppy field. I love seeing the wild flowers, too often they are being weeded out of manicured gardens, so it was great seeing them being embraced in such a large flower bed in the middle of the botanics.

Hope you all had a great weekend and stay tuned for more Delphines and other Love at First Stitch garments (including one with a lot of bunnies). Also have you heard that Tilly is having a 20% off sale you can find the discount code in her announcement here

Tuesday 15 July 2014

Sew La Di Da's 1950s Rose Dress

1950's Rose English Tea Dress
Talk about leaving things to the last minute... my friends birthday was on Friday night and in my infinite wisdom I decided, on the way home from work, on Thursday that I was going to make a new dress for the occasion. I don't really know what got in to me but when I got home that evening, I threw all caution to the wind and started chopping into my lovely spotty fabric. After all the pattern said that it was my exact size so why wouldn't it fit me brilliantly (certainly not something I would usually say)! Thankfully the end result was pretty true size and actually fit me pretty well. By the time I went to sleep I had everything sewn up and was ready for the zipper and hem. The next day I sewed the buttons on the bus on the way to the office and then rushed home at the end of the day to put in my zipper and hem before running out again for the party. I know I'm crazy but the end result was a lovely night in my brand new 1950's Rose English Tea dress from Sew La Di Da

Party dress in a hurry
The 1950's Rose is another one of my pattern finds from the Sewing for Pleasure show that I went to back in March.  Sew La Di Da had a stand at the show and had brought along a sample display of each of their vintage inspired dresses. The samples were mainly all in a plain calico type fabric which really let you appreciate the details of the patterns and let your imagination fill in the blanks for the fabric options. 

My new frock
Speaking of fabric... I chose this lovely cotton from a nearby stand at the show. I really wish I had taken a note of the name of the shop as I bought some of my most favorite purchases of the show from it (including the fabric for my Hummingbird Cambie). Anyway, I think the choice of cotton was a good one for the Rose as it holds all of the pleats nice and crisp. The cotton also gives the skirt a little body when you choose to wear it without a petticoat.

Petticoat with or without?
In terms of difficulty, I think that once you get your head round the construction of the first pleat then it is really straight forward from there. I quite enjoyed the method for creating the pleats. It involved a permanent line of stitching to hold the seam at the back of the pleat and a line of temporary stitches at the front of the pleat. This essentially created a series of tubes in the skirt which were closed at the top with two short rows of stitches. With everything held neatly in place it made pressing the pleats a piece of cake and also had the added advantage of reducing the bulk of fabric you are wrestling with until right at the end. This method of creating the pleats means that right before sewing the hem you get the satisfaction of removing all of the long temporary stitches to reveal your beautifully pleated full skirt. 
Full skirted fabulousness!
Also, I have a new respect for the folk out there who manage to capture good "twirly" photos. I tried a couple of times and this was the best I could get. Good fun trying though!

My attempt at the twirly photo
Finally, I just wanted to add how much I love the way the Sew La Di Da instruction have been written. You get a real feel for the character of the designer. I particularly liked the use of the word frock! 
So to sum it up, I love the, construction sequence, real style paper pattern, neckline, pleats, princess seams and all in one bodice/skirt pattern pieces. I don't really have anything that I dislike but it would be nice to see, some more pattern related information on the pattern envelope and perhaps some colour or slightly clearer photos in the instruction. That said, I really enjoyed making this dress and I look forward to trying more of the Sew La Di Da patterns.

Partaaay!

 In other news, I must be on some kind of lucky streak as I have been fortunate enough to have my name drawn by Fiona of Diary of a Chainstitcher in her Capital Chic Patterns competition. So stay tuned for my interpretation of Sally's wonderful White Russian sweatshirt pattern

Wednesday 9 July 2014

Spring Sewing Swap

A couple of months ago I decided to join in with the SpringSewing Swap organised by Kerry from Kestrel Makes. I thought it would be a great opportunity to get to know someone new from the sewing and blogging community as well as a chance for some selfless shopping and a chance to gain an understanding of what sort of image I present from my blog. 

I was partnered up with Rachel from A Study in Stitching. I had a whale of a time snooping through Rachel's blog. She has a wonderful tab all about her Stash Diet Pledge which carefully details all of the patterns that she own and has a photo of all the fabric in her stash. This was a great help when I was trying to suss out what she might like.


Check out all of these lovely goodies that Rachel sent me. As well as snooping through her blog, Rachel and I were also lucky enough to meet at the Minerva Crafts Meet-up. This gave us both a great opportunity to work out each others style and chat about our upcoming project plans. When we were at the meet up Rachel made a very astute observation (I think based on the bundles of fabric in my arms and my meet up dress) that I like small prints and blue. I had to admit that she was totally correct but that it would be nice to have something different in my wardrobe.
So when I opened my parcel and found this small print fabric in red I was delighted. Its still in my happy zone but a lovely change from all that blue. With matching thread to boot!


I have to admit that I spied this pattern in Rachel's pattern stash and I did fall for it somewhat. This is Simplicity 5107, I believe it was printed in the early 60's. It comes with two options: the dress as shown in the middle drawings; and a "jumper" as shown in the two smaller drawings. I'm not entirely sure I would describe this view as a jumper but never the less this is the option that intrigues me the most. 


I really like these buttons. I have been planning on making another Viola Skirt which is more office appropriate since finishing my last one. Luckily there are just enough of these lovely buttons to add to a Viola and give it a bit of interest.
Rachel also gave me a Clover chaco pen style liner, I have had a chance to use one of these before and they are ideal. I find that they don't distort the fabric as much as solid chalk and give a much more precise line. 

6 of spades
To see what I sent to Rachel in return check out Rachel's swap post. Huge thanks again to Rachel for sending me such lovely things and a massive thanks to Kerry for hosting the swap. I have really enjoyed taking part and will be keeping an eye out for swaps in the future. 


Thursday 3 July 2014

Minerva Craft Prize Draw

Can you imagine my excitement when these two huge boxes arrived from Minerva Crafts?

As I mentioned in my previous post I was lucky enough to win the Minerva Craft Meet-up Prize Draw. So... what came in the prize package, I hear you say? 

Well, there was a brand new sewing machine from Janome, a Prym storage trolley and a  big Hemline haberdashery bundle worth a grand total of around £600. I am still having a hard time believing that I have won it all. I am super excited about everything in the prize bundle. I don't want to go though everything but here are a few of my favorites.
Janome CXL301
I have heard great things about this Janome CXL301 sewing machine. My mum tells me that it is the same machine that she used at her quilting class. It certainly did a fab job of tackling the intricate piecing and quilting through all those layers.
I might be veggie but I can still love ham and sausage!
When I saw this tailor's sausage and ham from Hemline in the box I nearly did a happy dance (I was in the office so it wasn't really appropriate)! It seems a little sad to be so excited about a couple of saw dust filled blobs but I have heard such rave reviews about these, that been looking at buying/making a pair of these for months now. I'm sure that all the sewists out there understand my excitement. 


Check out this trolley from Prym! It carries everything I would possibly want to travel with and has plenty room left to spare. The prize also included a Hemline sewing machine bag which fits my machine perfectly and it has a great pocket in the front for the foot pedal and power cable. With these two I can sew anywhere now.


Sewing machine bag
I also received all of these wonderful Hemline goodies too. I feel very lucky.
Haberdashery bundle
A massive thank you to Minerva Crafts, Janome, Hemline and Prym for supporting the prize draw. Also, a big thanks to Vicki from Minerva Crafts, who made sure everything was delivered safely and did a fantastic job during the Meet-up!

Finally, if you are interested in seeing more of the purple spotty dress I am wearing, I will be talking about it in an upcoming post. So, remember to follow me so you can read all about it.


Thursday 26 June 2014

Royal Highland Show Inspired Bag


I had a fantastic time a the Royal Highland Show in Edinburgh this weekend. My man and I hadn't planned on going to the show but unfortunately we had to cancel our original plans for the weekend at short notice. So instead of having a wasted day we decided to take the opportunity to spend it at the show. For those of you who are not familiar with the Highland Show it is Scotland's annual farming and countryside extravaganza and it is HUGE! Not only is there every type of farm animal you can think of but there is also an impressive range of agricultural equipment, entertainment, shopping and a fab food hall (with so many samples on sticks we didn't need lunch).


Not long after we decided to go I remembered that I had picked up a fat quarter with a fantastically wild farm print when I was a the Spring Quilt Festival earlier this year. How many opportunities do you get to use farm print fabric, I thought? 


I knew that I wanted to make a bag from this fat quarter so I went online a searched for simple fat quarter bag ideas. One of the first that I found was the Fat Quarter Bag Tutorial from Amy Smart of Diary of a Quilter. What I created was based roughly on Amy's tutorial but was a bit larger so I could fit my purse and other essential in.

The bag is fully lined using another fat quarter which I bought as a spare when I made my Aunt a tote bag for Christmas. I also coppied Amy's idea and included a strip of ribbon on the front of the bag. Altogether it was finished in a jiffy (ie started after dinner and finished before bed) and served as a lovely farm themed handbag for the day. I think now that the show is over, my little bag will spend the rest of its life carrying my lunch to work.  

So... here is my bag at the show along with some of the competitors we met throughout the day.

Prize winning hen
My new best friend
Highland Calf

Feeding time at the goats

Gigantic Bull
Highland Ponies
Pony on parade
Horse getting new shoes down at the forge
Highland Coo!
The Food Hall